How to Setup a G Network for IP Cameras: A Step-by-Step Guide
Are you looking to set up a network for your IP cameras? With the increasing demand for remote surveillance and monitoring, setting up a G network for IP cameras has become a necessity for many homeowners and businesses. In this article, we will walk you through the step-by-step process of setting up a G network for your IP cameras.
Understanding the Basics of IP Cameras
Choosing the Right Equipment
The first step in setting up a G network for your IP cameras is to choose the right equipment. You will need the following:
- IP cameras: You can choose from a variety of IP cameras, including Wi-Fi cameras, PoE cameras, and wired cameras.
- Router: A router is necessary for connecting your IP cameras to the internet.
- Switch: A switch is necessary for connecting multiple IP cameras to the router.
- PoE injectors (optional): PoE injectors are necessary if you want to power your IP cameras over the network.
Step 1: Connect the IP Camera to the Router
Once you have chosen your equipment, the next step is to connect the IP camera to the router. You can do this using an Ethernet cable or wirelessly using a Wi-Fi connection. If you are using a wired connection, make sure to connect the camera to the router using an Ethernet cable.

Furthermore, visual representations like the one above help us fully grasp the concept of G Network Setup For Ip Cameras.
Step 2: Configure the Router Settings
After connecting the camera to the router, you need to configure the router settings. This includes setting up the router's IP address, subnet mask, and default gateway. You can usually do this by logging into the router's web interface using a web browser.
Step 3: Configure the IP Camera Settings
Once the router settings are configured, you need to configure the IP camera settings. This includes setting up the camera's IP address, subnet mask, and default gateway. You can usually do this by logging into the camera's web interface using a web browser.
Step 4: Test the Connection
After configuring the router and camera settings, it's time to test the connection. You can do this by accessing the camera's live feed using a web browser or mobile app.
Setting up a G network for your IP cameras is a relatively simple process. By following the steps outlined in this article, you can set up a secure and reliable network for your IP cameras. Remember to choose the right equipment, configure the router and camera settings, and test the connection to ensure a smooth setup process.
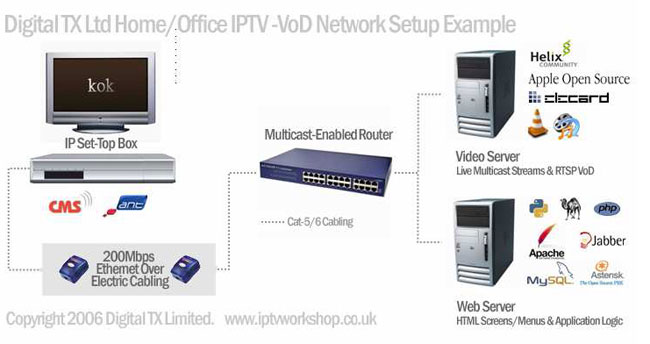
This particular example perfectly highlights why G Network Setup For Ip Cameras is so captivating.
Additional Tips and Troubleshooting
Here are some additional tips and troubleshooting tips to help you set up your G network for IP cameras:
- Make sure to configure the router's firewall settings to allow incoming traffic from the IP camera.
- Use a static IP address for the camera to ensure a stable connection.
- Use a PoE injector to power the camera over the network.
- Use a network video recorder (NVR) to record and store video footage from the IP cameras.
- Use a mobile app or web interface to access and control the IP cameras remotely.
Benefits of a G Network for IP Cameras
A G network for IP cameras offers several benefits, including:
- Remote access: You can access the IP cameras remotely using a web browser or mobile app.
- Real-time monitoring: You can view live video footage from the IP cameras in real-time.
- Secure transmission: The IP cameras transmit data securely over the network using encryption.
- Scalability: You can easily add or remove IP cameras from the network as needed.
- Cost-effective: A G network for IP cameras is a cost-effective solution for surveillance and monitoring.
In conclusion, setting up a G network for IP cameras is a relatively simple process that offers several benefits. By following the steps outlined in this article and using the additional tips and troubleshooting tips, you can set up a secure and reliable network for your IP cameras.


")


 - officefixes.com")


 - ipcent.com")


