G Router Setup for IP Camera: A Comprehensive Guide
IP cameras are an essential part of modern surveillance systems, providing real-time video feeds and remote monitoring capabilities. However, setting up an IP camera can be a daunting task, especially for beginners. In this article, we'll walk you through the process of configuring a G router for IP camera setup, ensuring a seamless and secure connection.
Understanding the Basics
Before we dive into the setup process, let's understand the basics of IP cameras and G routers. An IP camera is a network-enabled camera that transmits video feeds over the internet. A G router, on the other hand, is a device that connects multiple devices to the internet and manages network traffic.
Step 1: Connect the Camera to the Router
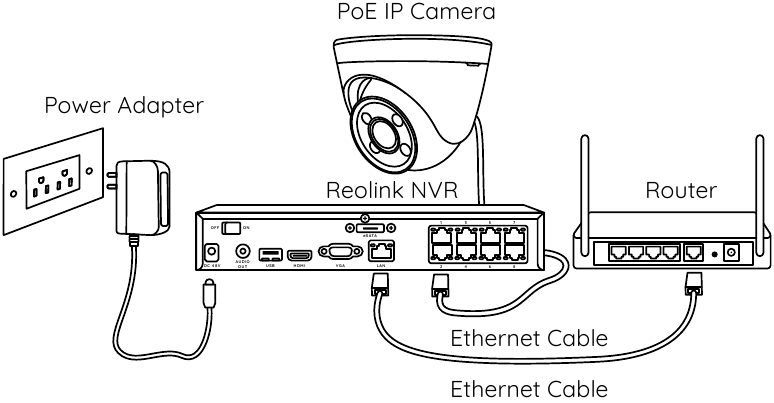
This particular example perfectly highlights why G Router Setup For Ip Camera is so captivating.
The first step in setting up an IP camera is to connect it to the G router. You can use an Ethernet cable (also known as Cat 5 or Cat 6 cable) to connect the camera to the router, gateway, or access point. If your IP camera has Wi-Fi capability, you can also connect it wirelessly to your network. However, a wired connection is more stable and secure than a wireless one.
Step 2: Configure the Router
Once you've connected the camera to the router, it's time to configure the router settings. You'll need to access the router's web interface using a web browser and follow these steps:
Step 3: Set up Port Forwarding
Port forwarding is a crucial step in setting up an IP camera. It allows external devices to access the camera's video feed. To set up port forwarding, follow these steps:
- Login to the router's web interface.
- Go to the Port Forwarding or Virtual Server section.
- Enable port forwarding and set the following ports:
- HTTP: 80
- HTTPS: 443
- RTSP: 554
- Save the changes.
Step 4: Set up DDNS (Dynamic DNS)
DDNS is a service that maps a domain name to a dynamic IP address. It's essential for remote access and viewing. To set up DDNS, follow these steps:

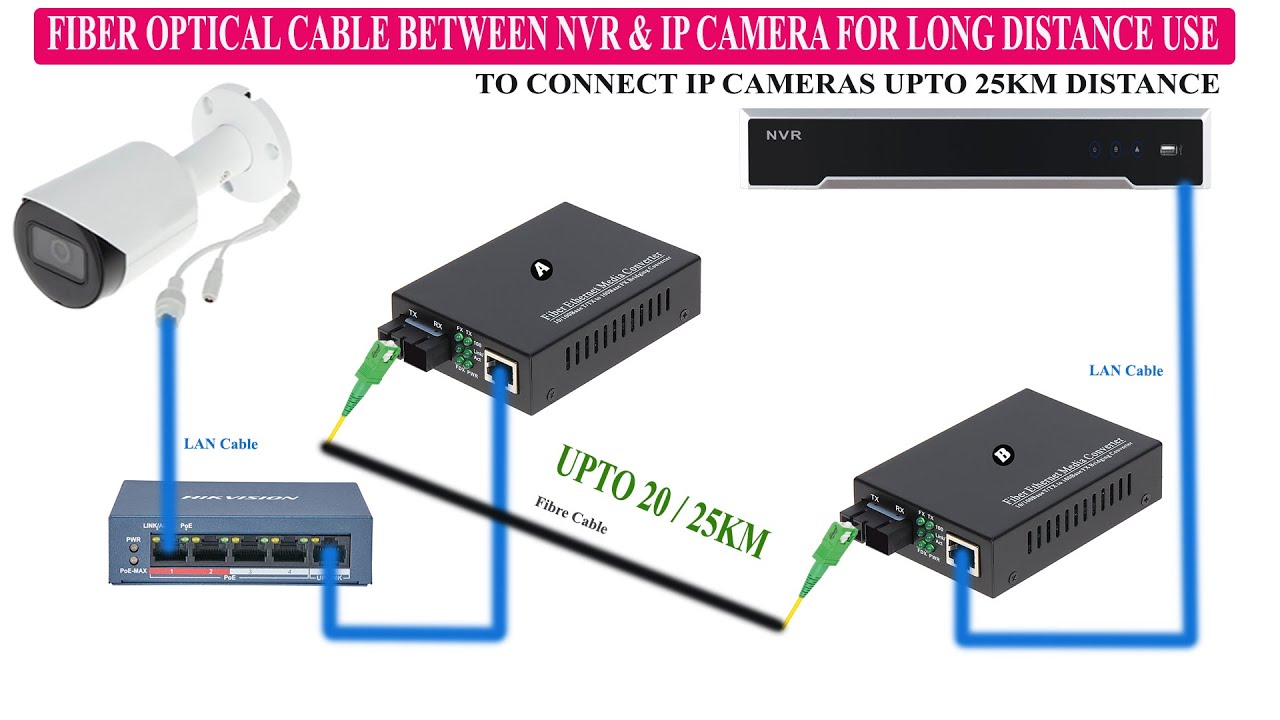
Moving forward, it's essential to keep these visual contexts in mind when discussing G Router Setup For Ip Camera.
- Login to the router's web interface.
- Go to the DDNS section.
- Enable DDNS and set the following settings:
- DDNS server: Your DDNS provider's server.
- Username: Your DDNS provider's username.
- Password: Your DDNS provider's password.
- Save the changes.
Step 5: Test the Connection
Once you've completed the above steps, it's time to test the connection. Open a web browser and enter the IP camera's IP address. If everything is set up correctly, you should see the camera's video feed. If not, check the router's settings and camera's IP address to ensure they match.
Conclusion
Setting up a G router for IP camera setup can be a challenging task, but with this comprehensive guide, you'll be able to configure your router and camera in no time. Remember to follow the steps carefully and test the connection to ensure a seamless and secure connection. With these tips, you'll be able to enjoy remote monitoring and video feeds from your IP camera.


 - ipcent.com")


")

