How to Setup Wireless Router for Guest Access
Are you tired of having guests at your home or office, only to have them scrambling to find your Wi-Fi password? Do you want to give them access to the internet without compromising the security of your primary network? If so, setting up a guest Wi-Fi network is the solution. In this article, we will guide you through the process of setting up a guest Wi-Fi network on your wireless router. A guest Wi-Fi network is a separate network that you can set up on your router that allows visitors to connect to the internet without accessing your main network. This means that your guests will have a unique internet connection that is separate from your primary network, and you can control who has access to it.Benefits of Setting Up a Guest Wi-Fi Network
There are several benefits to setting up a guest Wi-Fi network, including: * **Improved Security**: By creating a separate network for your guests, you can prevent them from accessing your primary network and any sensitive data it may contain. * **Increased Control**: With a guest network, you can limit the types of devices that can connect, limit the amount of bandwidth, and even set a time limit on the connection. * **Easy to Setup**: Setting up a guest network is relatively easy and can be done in just a few steps.How to Set Up a Guest Wi-Fi Network
:max_bytes(150000):strip_icc()/001-guest-network-for-home-tutorial-818204-37a2774c65c945c69093d0c18262042c.jpg)
Such details provide a deeper understanding and appreciation for Setup Wireless Router For Guest Access.
Setting up a guest Wi-Fi network is a straightforward process that can be completed in just a few steps. Here's a step-by-step guide to help you get started: 1.Step 1: Access the Router Web Interface
Open a web browser and type in the IP address of your router. The IP address is usually printed on the underside of your router or in the user manual. Once you access the web interface, log in with your administrator password. 2. Navigate to the Wireless settings section of your router's web interface. This is usually found under the Advanced or Wireless Settings tab. 3.Step 3: Create a Guest Network

Moving forward, it's essential to keep these visual contexts in mind when discussing Setup Wireless Router For Guest Access.
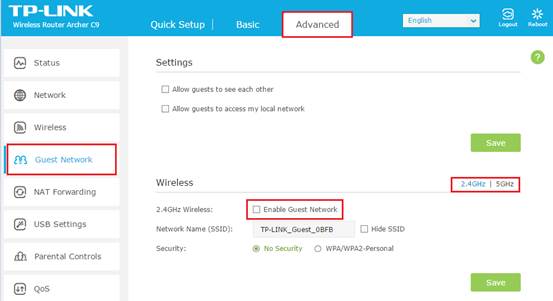
Look for the option to create a guest network. This may be called something like "Guest Network" or "Wi-Fi Guest Network." Select this option and choose the type of network you want to create - 2.4GHz or 5GHz. 4.Step 4: Configure the Guest Network
Enter a name for your guest network (this will be the SSID) and select the type of security you want to use (WPA2 or WPA3). You can also set a guest network password and limit the amount of bandwidth. 5.Step 5: Save the Settings
![[Wireless Router] How to set up Guest Network on ASUS Router? - Setup Wireless Router For Guest Access](https://www.digitalcitizen.life/wp-content/uploads/2024/12/asus_wifi_iot_guest-12.png "[Wireless Router] How to set up Guest Network on ASUS Router?")
")


")


![View of How to Set Up a Guest WiFi Network [Step-by-Step Guide] - Reolink](https://i.ytimg.com/vi/q-hAH1AfgEo/maxresdefault.jpg "How to Set Up a Guest WiFi Network [Step-by-Step Guide] - Reolink")
")
- 3x1G Ports, Easy Setup ...")


